Hair and Makeup Tutorial – Dramatic Copper Eyeshadow with Soft Curls!

Hi everyone! So today’s blog is something a little different to my usual posts, a makeup AND hair tutorial! The focus of this look is the dramatic eyes and the soft curls in the hair, so I’m not going to be doing a step by step on my foundation, blusher etc. If you do want to know what products I used for that then please comment below and I’d be happy to answer!

Eye Makeup 

To achieve this look I only used my Urban Decay Vice 3 Palette, so if you have this then get it ready! I have included a photo of the palette with the shade names in this post, so you can see what the shades look like in the pan and this will help you to look through your collection and find good alternatives. img_0925 img_0935

For this look I started with the shade Truth, which I used as a base and applied this all over my lid and into my crease. This just helps to make all the shades stand out if you are planning on using bright colours.

I then took the shade Undone and just applied this through my crease quite lightly and blending out thoroughly – This will be our transition shade to help with blending the Copper shade later on.

The shade Sonic was then applied all over the lid, and through the crease. I packed this colour on as much as possible as I wanted it to be very bold and dramatic. I made sure to blend it out very well as it’s such a bright shade. I also lined under my eye with this shade.

Once I had packed on the Copper, I took the shade Defy just on the outer V and through the crease very lightly. This just gave some depth to the Copper so that it wasn’t all one shade.

Lastly, I used Last Sin to highlight my Inner corner to brighten up my eyes.

To line my upper lash line I used the Rimmel Exaggerate Liquid Liner as this is my favourite at the moment. It doesn’t smudge and is SO easy to apply!

For Mascara I chose the Benefit Roller Lash. This is a great mascara if you are looking for length and volume but don’t want the clumpiness that comes with some mascaras.

To finish off the makeup look I went for Mac’s Creme Cup lipstick which is a light pink nude shade.

IMG_3817

IMG_3784

Hair

The hair was actually pretty quick and easy to do. I parted my hair into a centre parting and then took my GHDs and added a few loose curls around the sides and back of my head, making sure to curl away from my face. I also curled each side of my fringe so that it looked like part of the main body of the hair. I then brushed through my hair to make the curls softer.

IMG_3821

Once my hair was curled, I took my go-to hair product right now, which is the Parlor By Jeff Chastain Moisturising Sea Salt Spray. I sprayed this all over my hair (Not going right into the roots) whilst lifting my hair up to get to the underneath sections too. I then started scrunching my hair with my fingers just to give it a bit of body. I did this a few times and the end result gives you a lovely soft natural curled look.

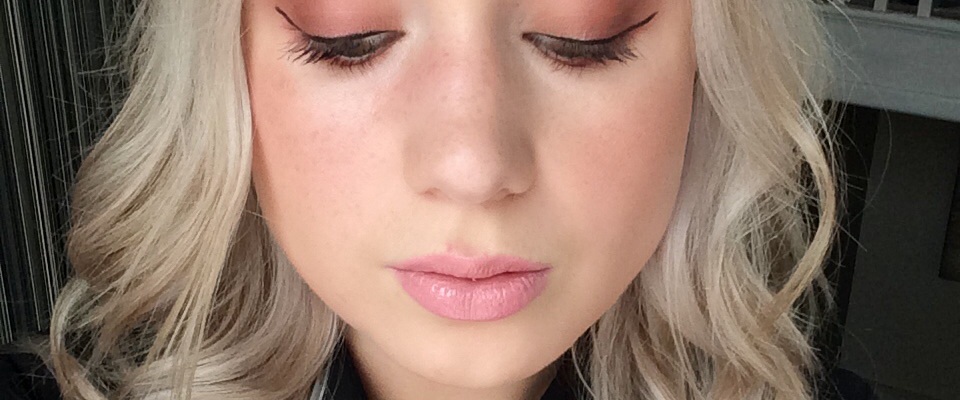
Here is the finished look!

IMG_3789

I hope you guys like it! Let me know in the comments if you would like to see more hair and makeup tutorials like this!

Thanks for reading 🙂

Little Miss Makeup x

Minimal Elegant Makeup Look featuring Winged Liner!

Hi girls – How are you all? I wanted to start with a little apology for not posting on here as much as I used to! This is mainly due to being extremely focused on my Youtube Channel ‘Little Miss Makeup’, but I need to find a balance somewhere between the two! I’m working on it, so please bare with me!

I decided I wanted to do a makeup tutorial on here as I feel like I haven’t done one in forever! The look I wanted to go for was something quite understated and feminine, and I definitely wanted to use winged liner as I’ve been getting back into it recently! Ive used a mixture of both high end and drugstore products so that hopefully this is suitable for everyone’s budgets, so let’s get started!

IMG_3756

Base

To prime my face I started with the Smashbox Photo Finish Hydrating Primer. My skin has been slightly dry lately so I always find this helps my foundation to blend in better and hide this! The foundation I chose was my favourite one right now, the Rimmel Lasting Finish 25 Hour Foundation. For a drugstore foundation this is just excellent! It says it is full coverage, however I would say it is more of a medium. I’m not the sort of person who likes to wear a full coverage foundation, especially during the day time, so this works for me just perfectly. For the concealer I chose the Collection Lasting Perfection Concealer. For those of you who haven’t tried this product, where have you been?! It has got to be the best affordable concealer right now, as it’s coverage is excellent and it is literally so cheap! I powdered my T Zone with my trusty Rimmel Stay Matte Powder.

Bronzer, Blush and Highlight

Lately I’ve been reaching for my Benefit Hoola Bronzer tons, so I went for this and just lightly contoured my cheeks and added some warmth to the areas of my face which would catch the most sun, like my nose and forehead. For blush I went for the Benefit Sugarbomb, and I chose the Stila Kitten Highlighter in the light champagne shade to highlight the tops of my cheek bones and on my cupids bow.

Eyes

I went back to my Too Faced Chocolate Bar Palette for today’s look, as it has some beautiful warm shades. I started with the shade White Chocolate (Satin/Matte white shade), and applied this all over my lid and crease as a base. I then went on to use Salted Caramel (Matte light brown with slight orange tones) and applied this through my crease with a fluffy brush, making sure to blend well. This just makes your crease look more defined, and brightens up your eyes as it’s a warm tone! I then took the shade Marzipan (Pearly light peach shade) and patted this all over my lid. I then took Cherry Cordial (Satin dark plum shade) and with a very soft hand, applied this onto my outer V area and through the crease, only into the middle. I blended this very well so that it didn’t look too dark or dramatic. I then highlighted my inner corners with Champagne Truffle (Shimmery Champagne shade) and the brow bone with White Chocolate that I used before.

IMG_3761

For my winged liner, I used the Rimmel Exaggerate Liquid Liner. I absolutely love the applicator on this, as it’s so fine but the brush doesn’t separate, so you get that perfect thin dramatic line. It dries quite matte as well which I like. It also doesn’t smudge or rub off! Basically, it’s the perfect affordable liquid liner! For my waterline I used the Elizabeth Arden Black Eyeliner as I find this one lasts really well and doesn’t irritate my eyes too much. To finish off the eyes I treated myself to the Dior Show Blackout Mascara. This mascara looks great and volumous, but beware, if you have watery eyes like I do then it can smudge quite easily! I only wear it if I know I don’t need the makeup to be on for the whole day, as I just know it wouldn’t last.

To finish off this look, I chose my current favourite Mac Lipstick in the shade Brave. It’s a Satin red/pink shade which is extremely flattering and easy to wear! I feel like it doesn’t get enough hype in my opinion!

IMG_3767


IMG_3757


So what do you think? Please leave a comment below with your opinion, and please send me pictures on Twitter, Facebook or Instagram if you try to re create this look!

Social Media

Twitter – LMMakeupBB

Instagram – Littlemissmakeupblog

Facebook – https://www.facebook.com/littlemissmakeupblog


Thank you for reading!

Little Miss Makeup x